Creamy BBQ Beans

Creamy BBQ Beans

blog 047

Serves 2 as a side

1 tbsp olive oil

1/2 onion

1 clove garlic

1 can haricot/cannelloni beans drained

1/2 can good quality chopped tomatoes

1 tsp smoked paprika

1 tsp dried thyme

1/2 tsp ground coriander

1/2 tsp mustard powder

pinch of salt and pepper

1 tbsp creme fraiche

1 tbsp of coriander leaves

  1.  Heat the oil in a large saucepan on a medium hob (3)
  2. Finely dice the onion
  3. When the oil is hot, saute the onion for 5-10 minutes until it is soft
  4. Add the garlic and stir fry for 1 minute
  5. Add all of the other ingredients, stir and leave it simmer for 20 minutes to bed in the flavours.  Stir every now and then.
  6. Halfway through, if it is getting a little dry, add a splash of recently boiled water
  7. At the end stir in the creme fraiche and top with the coriander leaves.  If you don’t like a big hit of coriander you can always chop these finely and add.
  8. Serve with sourdough toast, steam green vegetables or omelette.


Chicken Liver Pate

Chicken Liver Pate

200g of chicken livers are about £1.50 from my local butchers making it a very cheap but tasty source of protein.

blog 031.JPG


50g butter

1 small onion

leaves from 1 sprig of fresh thyme

200g chicken livers

2 tbsp full fat live yoghurt

1 tbsp tomato puree

Pinch of salt and pepper

Pinch of ground allspice

1/2 tsp ground ginger

  1. Finely chop the onion and pick off the leaves from the thyme
  2. Take 10g of the butter and melt in a medium sized saucepan on medium low heat (3)
  3. Once  melted turn the heat down a little and let the onion and thyme cook in the melted butter for 10 minutes.
  4. Meanwhile, wash the chicken livers and trim away any sinew.  Pat dry with kitchen roll.  Chop into 15mm pieces.
  5. Remove the onion mixture from the pan into the food processor bowl and set aside
  6. Add another 10g of the butter to the pan and cook the chicken livers on high for 2 minutes until caramelised on the outside.
  7. Place all the ingredients into the food processor.  Blend until as smooth as you can get it.
  8. Pass the mixture through a sieve so you are just left with the smooth mixture and leave to cool.
  9. Seal with melted butter if you wish but I don’t believe it’s necessary.
  10. Serve with sourdough toast or oatcakes.
  11. The pate will freeze but remember not to heat when defrosting or else the yoghurt may curdle and split.


Adventures in Sourdough

Adventures in Sourdough


Blog 033

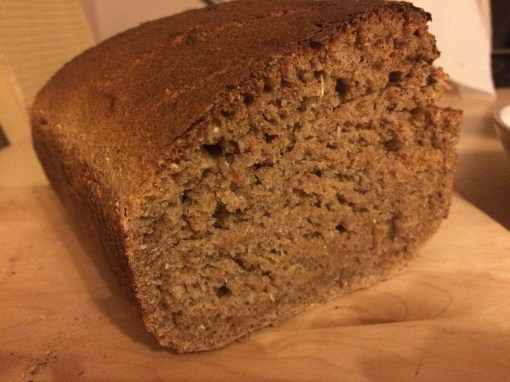
Yesterday I made my first ever sourdough loaf. I don’t know if it’s because I made everything from wholemeal spelt flour but it was absolutely delicious!  It didn’t taste at all sour and the crust on the outside was crunchy and divine!

I was missing bread and looked back through the notes my nutritionist gave me and she said that sourdough was ok!  I thought I would make it from scratch to be totally sure it had no sugar in it. I used to get it from Gails Bread shop which listed all the ingredients. This is a good option if you live in London.

The first time you make sourdough you either have to make or buy a “starter” which replaces your yeast. I made mine, it took about 14 days to make, after a couple of days, every day you have to throw half away and add more ingredients so it’s a bit of a commitment and you end up eating a lot of sour pancakes! I found the Shipton Mill website gave amazing advice for this.  Once you have your starter you don’t need to make it again but you need to refresh it once a week.

I found the recipe for the bread had to come from many sources as I was making my bread from wholemeal spelt and I didn’t want to use sugar, orange juice or honey. It also depends on the temperature of you house, your oven, your equipment and the sleepiness of your starter.  I didn’t realise until afterwards how important the final fold was. I looked at a number of you tube videos and this was the best at explaining it. Go to 8:30 minutes in https://youtu.be/be57uXRf5xo.

Makes 1 loaf

733g wholemeal spelt flour

431 warm water

10g salt

127g sourdough starter

(50g wholemeal spelt flour if you want to top up your starter)

  1.  Refresh the starter 12 hours before you start cooking so that it’s active.
  2. Add the starter and water to the food processor bowl, stir.
  3. Add the flour and mix with a dough hook on the food processor.  I couldn’t find my dough hook but I had something that had plastic “blades” instead of metal ones and that worked fine.  Mix until it forms a dough and the edges of the dough naturally move away from the sides.
  4. Leave to prove for 30 minutes.
  5. Meanwhile if you want to top up your starter its 50g wholemeal spelt flour, 76g warm water
  6. Add the salt and mix for 2 minutes in the food processor.  You don’t want to overknead as you’re using spelt instead of flour so the gluten is more likely to break up.
  7. Put the dough on the table and briefly knead whilst feeling the consistency.  It should be sticky but not sloppy.  It shouldn’t leave a residue on the work surface as you knead. Add more flour if needs be.
  8. Oil a glass bowl and place in there with clingfilm over the top.  Take a photo of the side and the top so you can see when it’s doubled in size.
  9. Leave in a warm dark place for 5 hours.  I used my airing cupboard.
  10. Knead for 3 minutes.  Again, you don’t want to overknead.  When it feels like an elastic band that’s lost its elastic, stop immediately.
  11. Line a bread tin with a tin liner.  I used a non stick silocone liner.  You can get these from John Lewis or Lakeland.
  12. Go to 8:30 minutes in https://youtu.be/be57uXRf5xo to see how to fold the dough.
  13. Place in the tin and cover with a tea towel.  Let it rise again for 3 hours, keep an eye on it, it should almost reach the top of the tin liner.
  14. 20 minutes before the 3 hours is up, preheat the oven to 220C.
  15. Spray about 10 squirts of water in the oven to increase the humidity.  Bake for 30 minutes.
  16. Leave to cool on a cooling rack before serving.
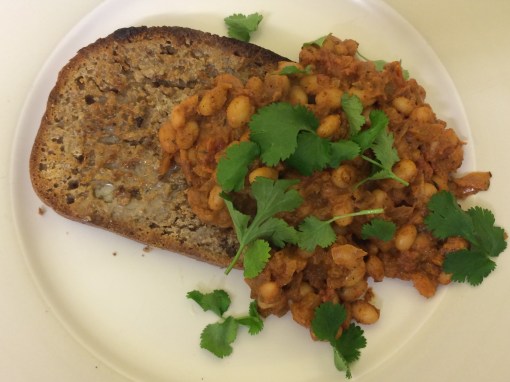
  17. Serve with no added sugar peanut butter, homemade chicken liver pate, hummus or just plain butter.


Millet and Spelt “Oatcakes”

Millet and Spelt “Oatcakes”

Makes 10 “oatcakes” of 8cm diameter

80g millet

80g wholemeal spelt flour plus a little more for flouring the work surface

60g butter plus a little more for greasing the tin

30g grated carrot

Pinch of salt

1 1/2 tsp caraway seeds

2 tbsp/30ml boiled water

  1.  Preheat the oven to 180C
  2. Grease the tin
  3. Add all the ingredients to a bowl and rub between your fingers to make breadcrumbs
  4. Bring together to make a dough
  5. Flour your work surface and rolling pin
  6. Roll out until about 5mm thin (this thickness gives it a biscuit like consistency)
  7. Use a round cutter to cut out.  You might have to gather up the edges and form into a dough and roll out a few times to get your 10 oatcakes
  8. Bake in the top of the oven for 10 – 12 minutes turning the tin around halfway through to prevent those at the back from burning.
  9. Serve with hummus, guacamole or just butter spread on top

Hummus from dried chickpeas

You might want to look on the instructions on the back of your dried chickpeas as to rehydrate them as some of them are heat treated so might take a little longer to cook.  These are East End chickpeas, found in most asian supermarkets and mine cost £1.49 per kilo.  Considering 100g makes enough for about 2 large pots you find in a supermarket it’s probably cheaper depending on the cost of the other ingredients. I do put in a lot of tahini though, I love it, I lick the spoon after, even though it makes my mouth go funny!

Hummus from dried chickpeas

Spring 2016 033

100g dried chickpeas

4 tsp tahini

2 tbsp oil

1 garlic clove

50ml water

1/4 tsp salt

1/2 tsp paprika

1/4 tsp cumin

Juice of half a lemon

1/2 tbsp extra virgin olive oil

  1. Soak the chickpeas overnight
  2. Wash twice
  3. Boil for 45 minutes
  4. Drain and leave to cool
  5. Once cool place all the ingredients except the extra virgin olive oil into a chopper or blender and blitz until smooth
  6. Add a little extra water if it looks too dry
  7. Swirl with extra virgin olive oil to serve
  8. Serve with crudites or oatcakes


Courgette, red onion and tomato omelette

Courgette, red onion and tomato omelette

Serves 1

Ebay 003

3cm courgette cut into 1cm half moons

1/2 red onion cut into 5mm half moons

1 small/medium tomato chopped small

1 tbsp oil

2 eggs beaten with a pinch of salt and pepper

  1.  Heat the oil in a medium sized saucepan and turn down to medium-low
  2. Preheat grill and boil the kettle
  3. Fry the courgettes for 5 minutes on one side then turn them over
  4. Add the onions and saute for another 5 minutes stirring so nothing catches
  5. Add a splash of boiled water and turn up to medium high and stir until the water has evaporated
  6. Add the tomato and stir fry for 1-2 minutes.  Stop before it gets too mushy
  7. Distribute the ingredients evenly around the pan.  Add a little more salt.
  8. Add the beaten egg to make the omelette and fry for 1 minute
  9. Put under the grill for 2 – 3 minutes until light brown and fluffy

Savoury Peanut Fro Yo

Savoury Peanut Fro Yo

I am a sugar addict so I cannot eat anything too sweet or else I will crave sugar again.  But I’m experimenting with some savoury alternatives to ice cream for fun!

Food Blog 001

Serves 1

2 tbsp full fat probiotic yoghurt

1 tbsp natural crunchy peanut butter (I use whole earth as it has no sugar or nasties)

  1.  Mix in a freezable contain and freeze for at least 24 hours
  2. 15 minutes before serving take out of the freezer to thaw a little
  3. After 15 minutes mix so that it takes on a creamy consistency and then serve with sliced fruit

Guacamole

Guacamole

Good fat, goes with sweet potato wedges, chia crackers, tex mex and mexican food.  So easy, you can’t go wrong.

guacamole

1 avocado

1 birds eye chilli

1 handful of the leaf half of fresh coriander

1 tbsp full fat probiotic yoghurt (sour cream or creme fraiche can also be used)

1/2 lime

Large pinch of salt and pepper

  1.  Peel and avocado and discard the stone
  2. Add with the yoghurt/cream, chilli, coriander, salt, pepper and the juice of the lime into a chopper/blender
  3. Blend until chunky/smooth, however you wish


Chia and Carrot Crackers

Chia and Carrot Crackers


Sometimes you need something a little chewy that’s not caramel and chia does this for you.  It’s also really healthy – loads of vitamins and minerals as well as protein and fibre.  The butter gives it a hint of a biscuit-like taste.

Chia and Carrot Crackers

Makes 5 crackers – scale up to make more

1/2 cup chia seeds

1/2 large carrot or 1 small carrot, peeled and grated

10g butter

  1. Preheat the oven to 150C
  2. Add 1/2 cup of water to the chia seeds and carrot in a microwaveable bowl
  3. Microwave for 2 minutes
  4. Meanwhile liberally grease a baking tin with the butter as the chia gets very sticky
  5. After heating the chia mix, stir and leave to cool for a couple of minutes
  6. Then take a fifth of the mix and squeeze into a ball, passing from hand to hand
  7. Squash down into a rough round cracker shape onto the baking tray.  Press down so it’s as thin as you can get it without breaking.  The thinner it is, the crispier the edges.  Don’t worry about getting it perfectly round.
  8. Repeat until all the mixture is used up.  You should have about 5 crackers.
  9. Bake for 15 minutes turning halfway through.
  10. Serve alone or with a dip such as guacamole.

DMCA Copyright Protected

© Elizabeth Winson and Raspberry Sundays, 2014 - 2016. Unauthorised use and/or duplication of this material without express and written permission from this site’s author and owner is strictly prohibited. Excerpts and links may be used, provided that full and clear credit is given to Elizabeth Winson and www.raspberrysundays.com with appropriate and specific direction to the original content. DMCA.com Protection Status